Categories
Uncategorized

If bees go extinct, this is what your supermarket will look like

reposted from this source

Over the past decade, bee populations have been dropping, partly as a result of a disease called colony collapse disorder. This is very bad news for humans, because bees are a crucial part of the reproductive cycle of many of our favorite foods, including apples, onions, avocados, and more. This incredible data visualization shows what you’d lose if the world lost bees.

Whole Foods created this image (see full image below) to make an important point that many people miss in discussions about extinction. When a life form goes extinct, it can also cause knock-on extinctions in its ecosystem. Without bees to fertilize fruit and other crops, we lose many species. That’s what it means to be part of an ecosystem in the first place: other life forms depend on you, just as you depend on them.

If bees go extinct, this is what your supermarket will look like

There are a lot of theories about how to bring bees back from their population collapse. One is to reform bee care practices, allowing queens to have multiple mates, creating hives with more robust genetic diversity. Another is to study whether there are microbial changes causing colony collapse — perhaps from viruses or gut bacteria associated with toxins in the environment.

In other words, paying attention to environmental problems is becoming a purely selfish issue. Protecting vulnerable species keeps fruit and vegetables on the table.

Categories
Uncategorized

Despite the Derecho

From LittleBigHarvest

Big storms came through our area last night (and I fell to sleep uneasily just as they started, thinking about everything that could happen, mentally going through my checklist of how to keep the family safe if I woke up to a tornado). I was having flashbacks of last summer’s awful, destructive storm, hoping the city wouldn’t go through the same damage again. I even learned a new word last night: derecho. It was all over Facebook, so of course I googled it;  a “long-lived, widespread wind storm associated with a fast moving band of thunderstorms” (more here on wiki). Wind. Ugh. My sleep was fitful and I dreamed of strong winds ripping apart the yard, the house, and strangely, I also dreamed of huge ocean waves.


This morning, I was pleased to find my house standing, dry, electricity on, and no apparent damage. After checking on all my sleeping family members, my next thought was the garden. Whew, everything appeared healthy, happy, and unscathed!


I even found my first two tomatoes this morning. Seeing the little green globes made my mouth instantly water, knowing the bursting happy flavor I’d be in store for, soon!


More summer storms may come, but for now, everything, including the garden, is safe.


1st tomato!!!


2nd tomato!!!


baby green bean


baby cucumber


baby basil


amish paste tomatoes


various other tomatoes and peppers


herb garden (the sage is taking over!)


Update: I went out later this afternoon, and found three more tomatoes. Hmm, I’m thinking all the stress and work of planting my tomatoes indoors too early MIGHT just pay off! Tomatoes in June..I don’t think that is the norm? The earlier the better.


Categories
Uncategorized

Nestlé introduces bottled water for “trendy, high-income” women

 (source: www.salon.com)

Nestlé introduces bottled water for

Ladies, if you’re lucky enough to live somewhere with access to clean drinking water, then you know that the stuff coming straight from your tap is enough to keep you alive in a purely physiological sense. But can you “live your best life” while drinking H2O from the sink? Can you “have it all” while drinking off-brand bottled water you bought at the deli?

The answer is no, you can’t

And Nestlé knows that, which is why the company launched “Resource” on Monday, a premium water made specifically for “a woman who is a little more on the trendy side and higher-income side,” according to Larry Cooper, group marketing manager for Resource.

Resource is more than just a beverage, it’s a reflection of who you are as a woman in the very deepest and most personal sense of your very being, as Cooper went on to explain to the New York Times: “We want to raise it to the level of a lifestyle brand,” he said, “where she’s proud to carry around Resource as her bottled water accessory, so to speak.”

Who is the Resource woman, you ask? Well, according to the promotional video, she loves yoga, nature and controlled acrobatics set to ambient techno.

Check it out here:

Categories
Uncategorized

Overgrown Weeds Law in Chicago Sends Native Plant Gardeners To Court

As the trend of turning yards into edible permacultures grows, I am seeing more stories like this one. It will be a struggle for a while, as society gets used to seeing food and beneficial weeds growing where there used to be tidy green lawns. 
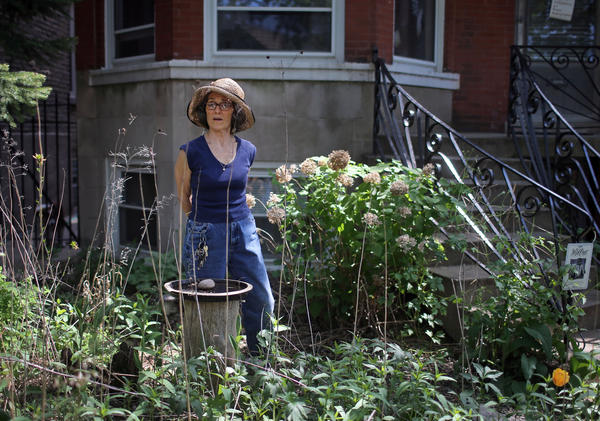
Kathy%20Cummings%20in%20her%20West%20Side%20natural%20garden%20Wednesday%2C%20May%2015%2C%202013.%20%28Brian%20Cassella%20%29

written by Mary Schmich of the Chicago Tribune

Chicago’s growing season is still young, and so far the alleged villain in Kathy Cummings’ garden is only 2 inches tall.

By summer’s peak, however, the accused will stand 4 gangly feet once again, and once again someone is sure to mistake it for a weed.

It’s milkweed. That is not a weed.

“If my award-winning garden got a ticket for weeds,” Cummings said one sunny day last week, standing in the small yard outside her West Town three-flat, “how safe is any garden?”

This question has nagged at her so hard and so long that she has now set out to reform Chicago’s weed ordinance.

But let’s back up.

Last fall, as my colleague Jon Yates chronicled in the Tribune in December, Cummings, a retired teacher, was ticketed for violating the weed law.

She went to court. She explained that the little dirt plots outside her home are filled with native plants. She showed the judge the plaque she received from the city of Chicago in 2004 commending her naturalized landscape.

The judge, in return, showed her several photographs taken by an inspector from the Department of Streets and Sanitation.

Looked like weeds to him, the judge said.

She was ordered to pay $640.

On her way out of court that day, Cummings asked for a copy of the photo that had particularly troubled the judge.

“I could see he was referring to milkweed,” she said.

Milkweed may sound like a weed, may look like a weed, but it is, in fact, a native plant, the only plant on which the monarch butterfly lays its eggs. The monarch butterfly happens to be the state insect of Illinois.

“The irony,” she said.

After the hearing, Cummings might have appealed her case. She resolved, instead, to fight not only her punishment but the law itself.

Using the Freedom of Information Act, she discovered that weeds are big business for the city of Chicago.

In 2009, Cummings says, the city issued 5,522 citations for weed violations and collected a little under a million dollars. Within a couple of years, after the City Council raised the fines dramatically — from $100 to $600 minimum — the number of tickets and the revenues shot up.

In 2012, according to Cummings, the city made $3.7 million from weeds. (A city representative did not answer my request to verify her numbers.)

But were all those unruly plants really weeds? A lot of them surely were, and weeds are pests. They can harbor rats, trash, drug deals. They can trigger allergies.

But how was an average citizen to be sure what constituted a weed?

The ordinance doesn’t define a weed except to say it’s vegetation taller than 10 inches that isn’t maintained. Unlike weed ordinances in some places, Chicago’s doesn’t name specific weeds.

So a few days ago, Cummings filed a legal complaint against the city.

In addition to calling the law downright unconstitutional, and claiming that native plant gardeners like Cummings are being denied their right to freedom of expression, the complaint asserts that the city is raising millions “on the backs of the poor” with a vague law that’s hard to interpret and erratically enforced.

“Say we had a law that says it’s illegal to speed,” said Cummings’ attorney, James L. Bowers. “The problem with that law is that it gives each police officer the authority to decide what’s a violation of the law. Somebody may think it’s 5 miles an hour. Or 10 miles an hour. The problem for the citizen is they don’t know what’s illegal until the police officer tells them. We’re asking the city to write a better law.”

Many native plant lovers share Cummings’ feeling. Among them is Monica Buckley, an editor for the American Bar Association and self-described “native plants enthusiast.”

In her view, not only is the law’s height limit confusing, so is the definition of a weed as vegetation that’s not maintained.

“That’s a very subjective measure,” Buckley said. “At this point, we have a city that’s ticketing people for vegetable gardens, for shrubs.”

The judges are a problem as well.

“There’s no knowledge of horticulture among the judges,” she said. “If you say, ‘These are native plants and I maintain them,’ they will not allow argument of any kind.”

Native gardens aren’t to everyone’s taste. No neat rows of tulips. No poodle hedges. They’re a riotous collection of plants that shift with the seasons. Some look weedier than others.

Largely on the grounds that aesthetics matter, a court has already rejected one claim that Chicago’s weed law is unconstitutional.

Even some native plant lovers might find Cummings’ garden a little too unruly. To her, it’s just history and nature at work.

“I like the idea of reaching back and bringing in the history of this part of the planet,” she said the other day.

She walked the small garden, touching one plant at a time. Bluebells, wild garlic, Solomon’s seal.

“This is horsetail. It’s prehistoric.”

“This little gem right here is pawpaw.”

“These are May apples. My idea is to have children walk home from school and be able to pick fruit.”

Plants, like the rest of beauty, are in the dreams of the beholder.

See original article HERE

Categories
Uncategorized

Easy and Productive Herbs using Herb Spirals

I remember seeing the herb garden at FutureFarming’s headquarters last summer, and I noticed it was circular, surrounded by rocks, and with an apparent plan. It may have been planted with the ‘herb spiral’ in mind.

Herb Garden At Future Farming


What is an Herb Spiral?

Locate your herb spiral close to the kitchen for easy harvesting. | The Micro Gardener

Here are some nice examples, followed by a blueprint that shows where to place what herbs. It’s not too late to get this going for the summer!

Herb spiral with compass points. | The Micro Gardener

Giant herb spiral with 50m pathway. | The Micro Gardener

Herb spiral on a small allotment. | The Micro Gardener

Herb spiral within a raised bed. | The Micro Gardener

Click here to enlarge the blueprint, found on Wiki


File:Herb spiral.svg

This blog post at www.themicrogardener.com is what got me thinking about herb spirals!

Categories
Uncategorized

Toxic Chemicals Found in Thousands of Children's Products

The study, called Chemicals Revealed, identified over 5000 children’s products such as clothing, car seats and personal care products that include developmental or reproductive toxins and carcinogens.

“The data shows store shelves remain full of toxic chemicals that we know are a concern for children’s health,” said report author Erika Schreder, science director for the Washington Toxics Coalition.

Some examples include: Hallmark party hats containing cancer-causing arsenic, Graco car seats containing the toxic flame retardant TBBPA (tetrabromobisphenol A) and Walmart dolls containing hormone-disrupting bisphenol A.

Some other major findings from the reports include:

  • More than 5,000 products have been reported to date as containing a chemical on Washington State’s list of 66 Chemicals of High Concern to Children.
  • Products reported so far include children’s clothing and footwear, personal care products, baby products, toys, car seats, and arts and craft supplies.
  • Toxic metals such as mercury, cadmium, cobalt, antimony, and molybdenum were reported, with cobalt being the metal most often reported.
  • Manufacturers reported using phthalates in clothing, toys, bedding, and baby products.
  • Other chemicals reported include solvents like ethylene glycol and methyl ethyl ketone, and a compound used in silicone known as octamethylcyclotetrasiloxane.

You can view the full analysis of the reports here.

Categories
Real Food vs. Fake Food Uncategorized

75 Percent of all ‘Honey’ Sold in Stores Contains no Honey at All

Just because those cute little bear-shaped bottles at the grocery store say “honey” on them does not necessarily mean that they actually contain honey. A comprehensive investigation conducted by Food Safety News (FSN) has found that the vast majority of so-called honey products sold at grocery stores, big box stores, drug stores, and restaurants do not contain any pollen, which means they are not real honey.

For the investigation, Vaughn Bryant, one of the nation’s leading melissopalynologists, or experts in identifying pollen in honey, and director of the Palynology Research Laboratory at Texas A&M University, evaluated more than 60 products labeled as “honey” that had been purchased by FSN from ten states and the District of Columbia.

Bryant found that 76 percent of “honey” samples purchased from major grocery store chains like Kroger and Safeway, and 77 percent of samples purchased from big box chains like Sam’s Club and Wal-Mart, did not contain any pollen. Even worse were “honey” samples taken from drug stores like Walgreens and CVS, and fast food restaurants like McDonald’s and KFC, 100 percent of which were found to contain not a trace of pollen.


The full FSN report with a list of all the pollen-less “honey” brands can be accessed here:
 

http://www.foodsafetynews.com/2011/…

So what is all this phony honey made of? It is difficult to say for sure, as pollen is the key to verifying that honey is real. According to FSN, much of this imposter honey is more likely being secretly imported from China, and may even be contaminated with antibiotic drugs and other foreign materials.

Most conventional honey products have been illegally ultra-filtered to hide their true nature

According to FSN, the lack of pollen in most conventional “honey” products is due to these products having been ultra-filtered. This means that they have been intensely heated, forced through extremely tiny filters, and potentially even watered down or adulterated in some way prior to hitting store shelves.


The US Food and Drug Administration (FDA) holds the position that any so-called honey products that have been ultra-filtered are not actually honey. But the agency refuses to do anything to stop this influx of illegitimate “honey” from flooding the North American market. It also continues to stonewall all petitions to establish a national regulatory standard for verifying the integrity of honey.

Ultra-filtering eliminates and destroys all medicinal properties of honey

Assuming that there is any real honey at all in the phony honey products tested by FSN, the removal of pollen and other delicate materials via ultra-filtering renders them medicinally dead. Raw honey is a health-promoting food that can help alleviate stomach problems, anemia, allergies, and other health conditions. Ultra-filtered honey is nothing more than a health-destroying processed sugar in the same vein as white table sugar or high fructose corn syrup.

The good news is that all of the honey products FSN tested from farmers markets, food cooperatives, and “natural” stores like Trader Joe’s and Whole Foods, were found to contain pollen and a full array of antioxidants and other nutrients. Local beekeepers are another great source of obtaining raw, unprocessed, real honey.

Be sure to read the entire FSN report at:
http://www.foodsafetynews.com/2011/…

Source:

http://www.naturalnews.com


Categories
Uncategorized

The Story of Glass Gem Corn

Wow! This corn looks so beautiful! I’d love to try growing some! -Andi

The Story of Glass Gem Corn: Beauty, History, and Hope

  By Steven Thomas |

If you’ve spent any time online lately, you might have noticed a striking photo making its rounds. Feast your eyes on Glass Gem corn: a stunning, multi-colored heirloom that has taken Facebook and the blogosphere by storm. With its opalescent kernels glimmering like rare jewels, it’s easy to see what the buzz is about. This is some truly mind-blowing maize.

For the staff at the Tucson-based seed conservation nonprofit Native Seeds/SEARCH, the viral explosion of interest in Glass Gem has been thrilling—but not surprising. As the proud stewards of this variety (along with the bioregional seed company, Seeds Trust) we are lucky enough to have grown and admired this extraordinary corn ourselves. Rest assured, this is no Photoshop sham. It is truly as stunning held in your your hand as it is on your computer screen. When you peel back the husk from a freshly harvested ear to reveal the rainbow of colors inside, it’s like unwrapping a magical present. And this is a gift that is meant to be shared far and wide.

Like many heirloom treasures, Glass Gem corn has a name, a place, and a story. Its origin traces back to Carl Barnes, a part-Cherokee farmer living in Oklahoma. Barnes had an uncanny knack for corn breeding. More specifically, he excelled at selecting and saving seed from those cobs that exhibited vivid, translucent colors. Exactly how long Barnes worked on Glass Gem—how many successive seasons he carefully chose, saved, and replanted these special seeds—is unknown. But after many years, his painstaking efforts created a wondrous corn cultivar that has now captivated thousands of people around the world.

Approaching the end of his life, Barnes bestowed his precious seed collection to Greg Schoen, his corn-breeding protégé. The weighty responsibility of protecting these seeds was not lost on Schoen. While in the process of moving in 2010, he sought out a place to store a sampling of the collection to ensure its safekeeping. Schoen passed on several unique corn varieties to fellow seedsman Bill McDorman, who was owner at the time of Seeds Trust, a small family seed company then located in central Arizona. (Today, Bill McDorman is Executive Director of Native Seeds/SEARCH.) Curious about the oddly named Glass Gems, he planted a handful of seeds in his garden. The spectacular plants that emerged took him by surprise. “I was blown away,” McDorman recalls. “No one had ever seen corn like this before.”

The story of Barnes, Schoen, and their remarkable corn is not unusual. For millennia, people have elegantly interacted with the plants that sustain them through careful selection and seed saving. This process, repeated year after year, changes and adapts the plants to take on any number of desirable characteristics, from enhanced color and flavor to disease resistance and hardiness.

The bounty of genetic diversity our ancestral farmers and gardeners created in this way was shared and handed down across generations. But under today’s industrial agricultural paradigm of monocropping, GMOs, and hybrid seeds, this incredible diversity has been narrowed to a shred of its former abundance. A 1983 study compared the seed varieties found in the USDA seed bank at the time with those available in commercial seed catalogs in 1903. The results were striking. Of the 408 different tomato varieties on the market at the turn of the century, less than 80 were present in the USDA collection. Similarly, lettuces that once flourished with 497 heirloom varieties were only represented by 36 varieties. The same held true for most other veggies including sweet corn, of which only a dozen cultivars were preserved out of 307 unique varieties once available in the catalogs. Though this data leaves some questions around actual diversity decline, the trend toward dwindling crop diversity is alarming. In just a few generations, both the time-honored knowledge of seed saving and many irreplaceable seeds are in danger of disappearing.

Though much of this diversity may be gone, all hope is not lost. The emergence of a breathtaking heirloom variety like Glass Gem reveals that the art and magic of seed saving lives on. It reminds us that we can return to this age-old practice and restore beauty, wonder, and abundance to our world. Indeed, this renaissance is already underway. The rising seed library movement is encouraging local gardeners to become crop breeders and empowering communities to reclaim sovereignty over their food. Our pioneering Seed School program at Native Seeds/SEARCH is training people from all walks of life in building sustainable local seed systems rooted in ancient traditions. And as eye-popping images of Glass Gem continue to spread around the world, Carl Barnes’ kaleidoscopic corn has become a beacon—and perhaps an inspiring symbol—for the global seed-saving revival.

To Purchase Glass Gem Seed

Many people have contacted us looking to obtain Glass Gem seed. We are currently sold out of the small quantity we had in stock, but there are plans to grow out a substantial amount this summer. Fresh seed should be available by October 2012. In the meantime, we have set up a waiting list for all who wish to purchase Glass Gem. Click here to be added to the list, and you will be notified as soon it becomes available. Native Seeds/SEARCH members will get priority access; click here to become a member. For those that have asked about its edibility, Glass Gem is a flint corn used for making flour or as a popping corn. Unlike sweet corn, it is not edible right off the cob. However, it was likely bred as an ornamental variety—for obvious reasons. Many of these exquisite ears are simply too beautiful to eat.

We encourage everyone who grows Glass Gem corn to rejoin the ritual of seed saving by setting aside your favorite selections for replanting the following year. Share seed with your friends and neighbors, organize a seed swap, or start a seed library in your community. Support Native Seeds/SEARCH in our work to conserve and protect Glass Gem corn along with the nearly 2,000 rare, aridlands-adapted crop varieties we steward in our seed bank. Your efforts and energy make a difference. As Carl Barnes has taught us, all it takes is one person to create a more colorful, diverse and abundant world—one seed at a time.

Original Article HERE

Categories
Uncategorized

Natural Playdough

Every winter I find myself trying to find enough indoor activities for the kids to keep us all from going absolutely stir-crazy. Homemade playdough is always at the top of the list: if you’ve never made it, you simply MUST try! We have made it countless times over the years; with careful supervision you can allow the kids to take part in most of the process. Our favorite part is when the dough comes off the stove, is dumped out onto the table, and is just cool enough to handle. Kneading and pressing into the still-warm dough, amazingly pliable and smooth, is a sensory activity that both kids and adults enjoy. Adding color to the dough is essential! I thought the idea in the following blog post by Thrifty Mama was new and exciting. Instead of food coloring, why not try using natural dyes?


homemade playdough recipe main Homemade Playdough Recipe with Natural Dyes

To avoid the artificial colorings in commercial products, we’re going to explore a homemade playdough recipe with natural dyes.  Don’t be intimidated.  This is going to be a blast.

You might remember this homemade playdough recipe tip from last year.  Well, I’ve come up with a few new colors I wanted to try out.  So join me as we see if we can improve on an old favorite.

NOTE: Even though this will eventually bring hours of joy to your children, I would suggest the making of this homemade playdough recipe be for adults only.  The boiling water and stovetop are major accident concerns for young children.  Let’s have fun and be safe at the same time!

The first thing we need to do is create our natural dyes.  Use this list as a guide to help you choose the colors you’d like in your homemade playdough and then follow the recipe below.

Natural Dyes for Homemade Playdough

  • Red and Pink – Cut up 2 small beet roots and combine with 1 cup of water.  Simmer over low heat for 20 minutes or until liquid is reduced by half. Puree in the blender.  Strain.  (Raspberries and strawberries would be a great alternative for bright red coloring.)
  • Orange – Simmer 4 large chopped carrots in 1 cup of water for about 20 minutes.  Cool completely.  Don’t worry if the water looks clear now.  Mine did, too.  Mix in a blender and mash through a sieve to retain 1/2 cup of dyed liquid.  (Carrot juice would work really well for this.  Nothing else would probably come close the bright orange in carrots.)
  • Yellow – Combine 1 cup boiling water, 1 whole grapefruit including rind, and one small sweet potato in a blender.  Puree.  Strain. Admire the beautiful yellow dye!  My kids thought it was orange juice.  (Turmeric and saffron are very bright yellow colorants.  These would be great alternatives if you already have them on hand.  Also, golden beets might work for a paler yellow.)
  • Green – Combine 2 handfuls of spinach with 1 cup of water in a blender.  Puree in blender.  Simmer on low heat for about 20 minutes or until liquid reduces by half.  Strain and cool.  (Kale is a great alternative for the green hue.)
  • Purple – Combine 2 cup of water with 3/4 head of red cabbage (roughly chopped).  Simmer on low heat for about 20 minutes or until liquid is reduced by half.  Puree in your blender and strain.  Reserve ½ cup as purple and set aside ½ cup for blue in next step.  (Blackberries and grape  juice would work really well for purple.)
  • Blue – Use 1/2 cup of the cooled red cabbage dye and add small amounts of baking soda until the desired blue color is achieved.  (Blueberries could be used for this instead.)
  • Tan – Combine 1 tablespoon of cinnamon with 1/2 cup water.  Strain.  (An alternative for brown/tan would be cocoa or coffee grounds.)
  • Off White – Place a dash of vanilla extract in a 1/2 cup of water.

homemade playdough recipe 1 Homemade Playdough Recipe with Natural Dyes

Now that our natural dyes are ready, let’s dive into the homemade playdough recipe!

Homemade Playdough Recipe

Ingredients

  • ½ cup of flour
  • ½ cup of dyed water (use natural dye instructions from above)
  • ¼ cup of salt
  • ½ tablespoon cream of tartar (for elasticity)
  • ½ tablespoon cooking oil (to help keep from drying out)

Directions

Combine all ingredients into your least favorite pan (It might stain or stick.  My pan was stainless steel and caused no problems, but you’ve been warned.)

homemade playdough recipe 2 Homemade Playdough Recipe with Natural Dyes

Cook dough on the stovetop on low heat until the mixture pulls away from the sides.

homemade playdough recipe 3 Homemade Playdough Recipe with Natural Dyes

When the mixture starts to look like the first time I tried to make gravy I pull it off the heat and let the heated pan finish the cooking.  It should look like mashed potatoes.  Dough should be clumping in the middle of the pan and no longer shiny.

Make sure to wash the pan and stirring utensil in between each color batch.

Allow it to cool enough for handling.  By the time I cooked all of my colors and washed the pan they were all cool enough to handle.  If it’s sticky you can try adding a small amount of flour.  Knead in your hands and enjoy the vibrant colors you have captured from nature.

homemade playdough recipe 4 Homemade Playdough Recipe with Natural Dyes

Aren’t you proud of yourself for making this homemade playdough recipe?  Now call the kids in and have a ball with your homemade playdough.

homemade playdough recipe 5 Homemade Playdough Recipe with Natural Dyes

Some final notes from my experience:

The cabbage in the blue and purple dyes really stinks.  I actually like cabbage and the first day the dough didn’t bother me at all.  But the smell of the dough after 4 days was almost unbearable to me.  Just a heads up.

Also, all of my doughs kept really well, but I did notice that the blue dough was much more tacky than the rest.  I kneaded in flour until I liked the consistency.  This did mute the color a little, but not too much.  Conversely, if the dough was a little dried out I just carefully added tiny amounts of water and worked the dough really well.  They all bounced back to like new condition.

Visit this page for more fun playdough ideas.

beth bio Homemade Playdough Recipe with Natural Dyes


Categories
Uncategorized

Bubble Wrap Window Insulation

Here’s a great tip for insulating your windows to save some energy this winter. I usually have bubble wrap laying around from mailed packages, and other than crafts I really never have a use for it–so this is perfect! The bubble wrap can be reused year after year, too.

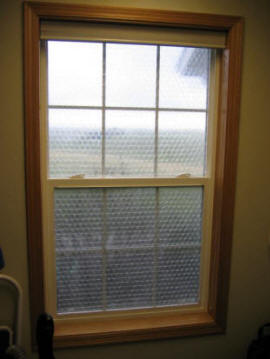
Bubble Wrap Window Insulation


I’ve used bubble wrap on windows for two three+ years now, and I’m amazed how quick and easy it is.  This year, we are even covering the windows in the guest room — we just take the bubble wrap down when guests come, and put it back up when they leave — 15 seconds a window.


This is a simple technique for insulating windows with bubble wrap packing material.  Bubble wrap is often used to insulate greenhouse windows in the winter, but it also seems to work fine for windows in the house.   You can use it with or without regular or insulating window shades.  It also works for windows of irregular shape, which can be difficult to find insulating shades for.


Its been five years since I put this page up, and I’ve heard from MANY people who are quite happy with using bubble wrap for window insulation.


The view through the bubble wrapped window is fuzzy, so don’t use it on windows where you need a clear view.  But, it does let plenty of light through.


I like the medium to large size bubbles.  The larger ones appear (from surface temperature

measurements) to insulate a little better, and you still get a nice artistic effect looking out of them.  The small bubble warp totally obscures the view, but you still get light.  Most people seem to prefer the large bubble version.


Installation

  • Cut the bubble wrap to the size of the window pane with scissors.
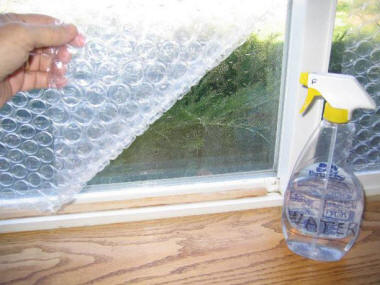
  • Spray a film of water on the window using a spray bottle.
  • Apply the bubble wrap while the window is still wet and press it into place.
  • The bubble side goes toward the glass.
  • To remove the bubble wrap, just pull it off starting from a corner.  You can save it and use it for several years.  It does not leave a mess or stains on the window glass.

If you have trouble with the bubble wrap separating from the window when the film dries, you can try adding a little Glycerin to the water, but this probably won’t be necessary.


A few small pieces of double back tape can be helpful on really stubborn windows.


The bubblewrap can be installed in the fall, and removed in the spring.  Judging by how mine looks after a year, it may last quite a while.


When you take the bubble wrap down, put a small number in on the upper right corner of each piece of bubble wrap, and write down which window that number goes with on a piece of paper.  Save the paper for the installation next fall.  This tells you instantly where each sheet goes, and which way its oriented.


Some places to get bubble wrap:

– Save up bubble wrap packing material that you and friends receive


– Check places that sell larger items like canoes or furniture — bubble wrap is often used for packing these.


– Check for wholesale suppliers of packing material in your area — these places will often sell a roll to the public.


– Here is one potential online source: http://www.uboxes.com (I’ve not actually tried them, but looks OK)


– As a last resort, places like the UPS store have it, but the prices are usually high.

.

Suggestion from Pat:
“Bubble wrap small bubble and large can be had for free by contacting furniture retailers or rental shops. They throw it away by the tons!”
I’ve heard the same thing for places that sell canoes.


(2/27/07 —   see note below on reported bubble wrap life)


Installation:


Click pictures to enlarge:


Spray water on glass with bubble side
toward glass

Smooth bubble wrap out so that water
contact holds it in place.


Double Bubble (added Nov 15, 2007)

I thought it might be worth a try to see if two layers of bubble wrap might be used.

This may be going a bit far, but it does seem to work.


I applied a 2nd layer of bubble wrap over the first layer in exactly the same way as the first layer was applied to the window glass.  That is, spray the first layer of bubble wrap with water mist, and while its still wet apply the 2nd layer of bubble wrap to it and smooth it out.
For both layers, the bubble side face the glass.

It has been a couple days since I did this, and it is staying in place OK — not sure if it will stay up with the added weight in the long term or not.


The two layers of bubble wrap fuzzy the view a bit more than one layer, but it still seems to transmit quite a bit of light.

The surface temperature on the 2nd layer is higher than the surface temperature on the first layer, so it is adding some insulation value.


Click on images to enlarge.

View through single and doubled bubble wrap.
Blue tape is to take temperature readings on with the IR thermometer.


Payoff

The bubble wrap has a short payback in cold climates.  About 2 months for single glazed windows, and half a heating season for double glazed widows.  Details on payback:

For an 7000 deg-day climate (northern US), and single glazed windows, the bubble wrap increases the R value from about R1 to about R2.  This cuts the heat loss from the window in half.
Heat losses with and without bubble wrap for 1 sqft of window are:


Heat loss w/o wrap = (7000 deg-day)(1 ft^2) (24 hr/day) / (1 ft^2-F/BTU) = 168K BTU per season


Heat loss with wrap = (7000 deg-day)(1 ft^2) (24 hr/day) / (2 ft^2-F/BTU) = 88K BTU per season


If you are heating with natural gas at $1.50 per therm (100 CF) in an 80% efficient furnace, then the saving for 1 sqft of wrap for the season is:


Saving per sqft = ($1.50)(168K – 88K)/(100K*0.8)  = $1.65 per season per sqft of window


The bubble wrap cost about $0.30 per sqft, so the payback period is about 2 months — not too bad!


If you repeat the numbers above for double glazed windows, the saving is $0.60 per sqft per season, and the payback period is a about one half heating season.


If you use a more expensive fuel like propane, fuel oil, or electricity, the savings will be correspondingly more.


Performance:

Here is my Rough Performance Test


Some interesting work done by students at LIU on insulation value of packing materials.  Probably not exactly applicable to windows, but interesting.


Bubble Wrap Life:


Doug reports that bubble wrap that he installed 6 years ago has about had it.  He thinks the life is around 5 to 7 years.  In his application, the bubble wrap stays up year round.


He reports that at the end of its life, it tends to stick to the glass, so replacing it before this happens might save some cleanup work.

The bubble wrap he is using was intended for packaging, so this still leaves open the question of whether the bubble wrap intended for greenhouses will last longer.  The greenhouse bubble wrap we installed is on its third winter, and is still doing fine.


Source: www.builditsolar.com